Every organization has its own set of workflows for everyday tasks. These workflows used to rely on paper forms, ledgers, and inter-office memos.
Most teams have now “progressed” to using Excel and email. While it’s better than physical paper, email-based workflows are still manual and inefficient.
The good news is that modern, cloud-based software is now putting the power of automated, digital workflows in the hands of non-technical business users.
In this piece, we’ll look at exactly how to create a workflow without any coding or I.T.
What Is a Workflow?
A workflow is a series of defined and repeatable activities carried out to accomplish a goal, according to a set of procedural rules.
A workflow is normally part of a larger business process. For example, purchase order approval and invoice payment are specific workflows within the overall procurement process.
Automating these workflows ensures that information is routed to the right people at the right time and that business constraints are properly enforced.
Steps to Creating a Workflow
- Start small but start now.
- Identify stakeholders and document who does what and when.
- Create a workflow diagram.
- Implement the workflow using simple automation software.
- Test the workflow.
- Deploy the workflow and train users.
- Solicit feedback and iteratively improve.
- Analyze and optimize. Communicate success.
Read on to learn more about these steps, or jump right to a specific, real-world example of creating an automated workflow with no coding.
1. Start Small, but Start Now
Don’t try to automate everything or get bogged down in I.T. committees. Find one everyday workflow and get that first, quick workflow creation win. Ideally, the first automated workflow you create will be repetitive, reasonably frequent, and have simple routing rules.
Along the way, you’ll learn what it takes to successfully create and deploy workflows in your organization and you can incorporate those lessons into your approach.
2. Identify Stakeholders and Document Who Does What and When
Once you’ve picked a target workflow, it’s a good idea to understand and document in detail how it’s performed today. You want to detail things like:
- What exactly is the workflow doing?
- What’s the exact sequence of steps? Are any of them optional or dependent on business criteria?
- Who are the people involved at each step and what decisions must they make?
- What content is created or modified?
- How long does each step typically take?
The best way to get a solid understanding of the workflow is to interview actual users. They’ll tell you what’s working and what’s not in the current setup.
3. Create a Workflow Diagram
Document a workflow diagram so the team can easily visualize the workflow’s steps and provide feedback. Use standard symbols and terminology to create your workflow diagram so it’s easy to understand.
In most situations, there’s no need for specialized software — you can simply use PowerPoint or Google Slides to create a flowchart.
Share the workflow diagram with your stakeholders and consult with them. When they feel like valued partners, they’ll not only help validate your flowchart, but also be more likely to actively support a successful implementation.
4. Implement the Workflow Using Simple Automation Software
Now, it’s time to digitize the workflow. In the majority of organizations, I.T. resources are severely constrained and available programming talent is scarce.
Fortunately, modern, low-code workflow automation systems like frevvo are highly visual and easy to use. Business users can automate workflows using simple drag-and-drop tools.
Even relatively small organizations can eliminate manual work and automate everyday tasks thanks to affordable, cloud-based solutions.
5. Test the Workflow
Testing is about more than finding and fixing bugs. Obviously, it’s important to ensure that the digital workflow does what it’s designed to do without errors.
In addition, a couple of User Acceptance Testing (UAT) cycles will help you pinpoint problems and deploy something that your team actually wants and likes.
UAT ensures that the people who have to use the new system have a say in how it’s designed. That way, they’re more likely to adopt it.
6. Deploy the Workflow and Train Users
Once tested, it’s time to roll out your new workflow. With modern platforms, this is very straightforward – often as easy as clicking a button.
Your workflow may function smoothly, but it won’t achieve anything unless people actually use it. You’re likely to encounter some resistance – most people don’t like change and are reluctant to let go of the current way of doing things.
In addition to teaching people how to use the newly automated workflow, a training program that clearly articulates how it benefits real users will go a long way. For example, explain how the new system will reduce tedious paperwork and free up time for more productive tasks.
7. Solicit Feedback and Iteratively Improve
Successful workflow management involves regularly revisiting your automated workflows to uncover issues or opportunities to improve efficiencies.
Once the team has used the new system for a period of time, they’ll be able to identify what’s working well and what needs to be improved. Take the time to go back and ask key questions:
- Are you doing less manual work?
- Do you genuinely have more time for things you care about?
- How can we improve?
After collecting this feedback, make sure you address issues as quickly as possible. Otherwise, people might abandon the system even though you got 90% of it right.
8. Analyze and Optimize. Communicate Success
Gather hard data about the time and cost savings of the automated workflow and compare it to the time and cost of the project itself. How much money will you save and when will you recoup the investment?
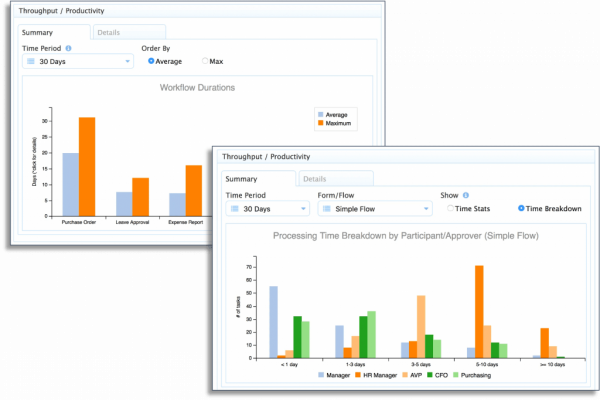
Using the workflow analysis features built-in to your automation software, analyze your workflows to find internal bottlenecks and improve efficiency.
Finally, share consequential success stories and recognize the efforts of the team. It’ll help bring real change to the organization and will always be appreciated.
Example: Creating a Purchase Order Approval Workflow
Note: To follow some of the steps in this section, you’ll need a frevvo account. You can sign up for a 30-day free trial.
Purchase order (PO) approval is one of the most common workflows performed by practically every organization. It’s typically frequent and not too complex, so it’s a good candidate for your first workflow automation project.
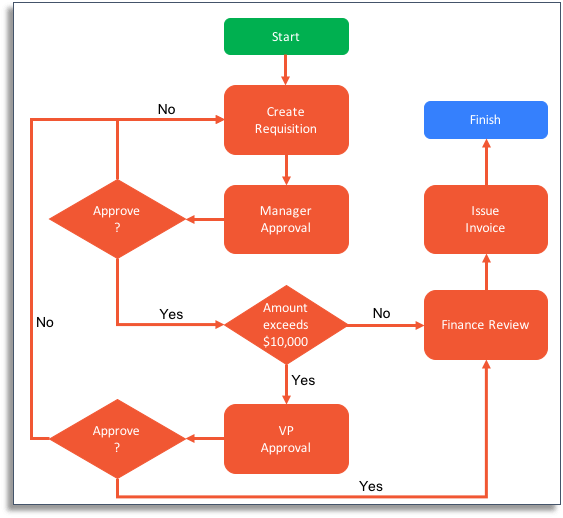
First, document the steps. A common PO approval workflow might be:
- An employee fills out the PO form, perhaps in Excel, and emails it to their manager for signature.
- The manager reviews the Excel, prints it out, signs it, and scans it back.
- If the amount exceeds some threshold, the manager emails it to a VP for secondary approval.
- The VP prints, signs, scans, and emails to the finance department.
- Finance issues a formal PO and emails it back to the original requesting employee.
Diagram
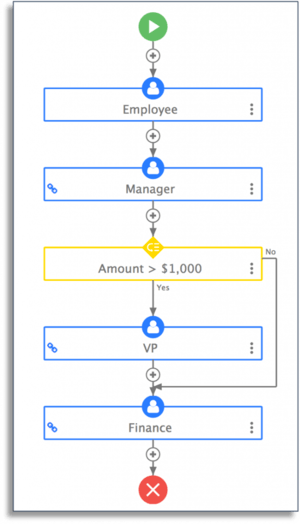
Create a workflow diagram of this process. Using frevvo, you can simply create the diagram in the workflow designer. Share a screenshot or PDF of the diagram with stakeholders to make sure it’s accurate.
Implement
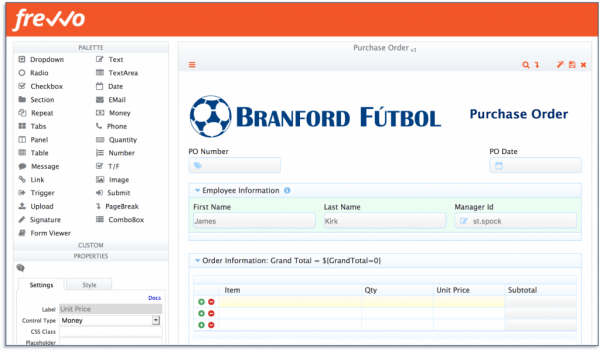
Now, you’re ready to automate. With frevvo, you can drag-and-drop to create your PO form and add things like electronic signatures, dynamic behavior, conditionally-visible sections, and business rules.
Similarly, you can add conditional routing to your workflow, configure notifications, and set up reminders without writing any code.
Test
frevvo’s portal feature gives users a convenient way to test out the workflow as they’d use it in real life. Remember to ask your users to test the workflow on their mobile devices.
User feedback is very easy to incorporate with frevvo. You can make changes and deploy them in real time so users can immediately see the effect of those changes.
Deploy and Train
After testing is complete, deploy the workflow.
Training users is usually very specific to your organization. It’s so important that, at frevvo, we offer customers a proven playbook aimed at teaching users how to use automated workflows.
Solicit Feedback
After the team has had enough time to adopt and regularly use the new workflows, reach out to learn what’s working and what you should improve. We recommend using frevvo’s built-in survey feature.
As before, incorporating feedback is easy and can be done in real time. We still recommend going through a testing cycle before deploying the updated workflow.
Analyze and Optimize
Use frevvo’s built-in reports and workflow analysis tools to identify bottlenecks, discover errors, and optimize performance.
Conclusion
Creating a workflow that’s automated and efficient is no longer a complicated process. You don’t need a whole slew of expensive programmers.
A low-code workflow platform like frevvo empowers your team to automate workflows and improve business processes without coding.
Want to automate your workflows — no coding required?
Save your time and sanity using frevvo’s simple, drag-and-drop tools to automate your everyday workflows. Sign up for a 30 day free trial.